Lake Como Painting Progression (continued)

Well the time has really gotten away from me this week, as we are in the home stretch of my daughter’s “learn from home” work for her last weeks of fourth grade. But I HAVE been making progress on my painting of Varenna, the start of which I shared in my prior post.

First things first… I thought before going any further I would share a little about the colors currently on my palette, and what I’ve been using to work on this piece.

palette2.jpg

I will start by saying that this is a pretty big palette of colors for me, and definitely larger than what I use for my field work. But because I have such limited studio time, it helps to have a few more “convenience colors” to work with so I don’t spend so much time mixing. Plus look at those yummy colors. Sometimes it is just plain fun to indulge in them, as long as I don’t have to carry them around in my backpack! The paints listed with an asterisk* by their name are the kinds of colors I nearly always use. This is basically a double primary palette with the addition of an earth (brown pink) and a “black” (Payne’s Gray, which is really almost a dark blue).

I pretty much always lay my basic palette out the same way in a clockwise fashion. So for instance, starting with my earth colors in the lower left, I move up to white, which is always in my upper left, followed by colors from warm to cool, generally speaking. This palette has varied over time with a few colors added, or removed, or others substituted from time to time when I want to experiment. For instance, my two reds used to be Cadmium Red Light and Alizarin Crimson, but I switched to a cooler Napthol Red for my “warm” because when tinted it makes a cleaner, less orangey pink. I will use Quniacridone Violet in a similar manner to my former Alizarin Crimson for nice dark purples or browns, to modify other colors.

If you are new to painting I would recommend starting out with a double primary palette (a warm and cool of each primary color, yellow, red, and blue) plus white, and then slowly adding new colors over time as you get a good handle of what your primaries can mix. You might be surprised at what even a single primary palette can do.

Okay, enough palette talk for now. Let’s recap;

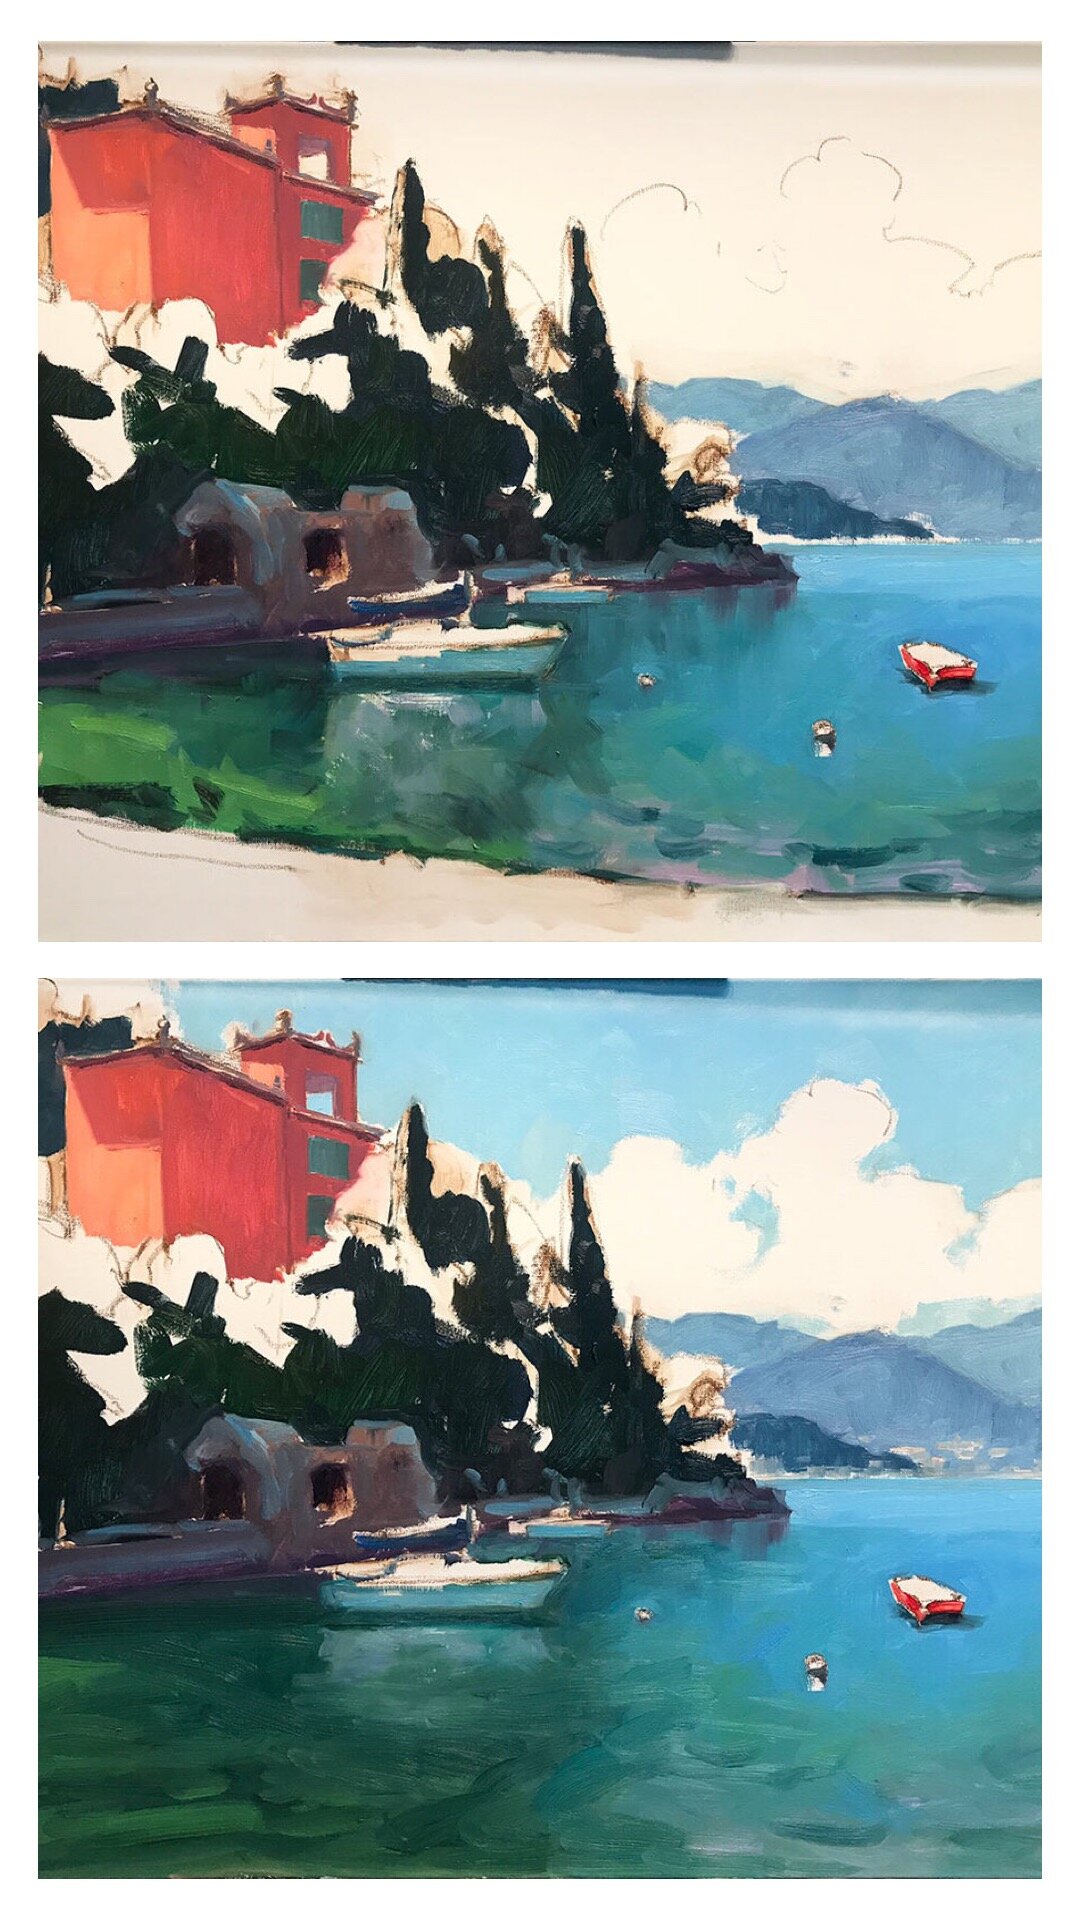
It’s time to address the rest of that white canvas by adding color to the lit side of the trees

varenna_demo_jenniferyoung

I also start addressing a few of the details of the foreground including boats and walkway to the town of Varenna.

varenna_demo_jenniferyoung

And finally (with a big caveat that this color is off because I was working on the painting at night and photographed it without the benefit of daylight) I start to address the masts, water, and clouds.

varenna8.jpg

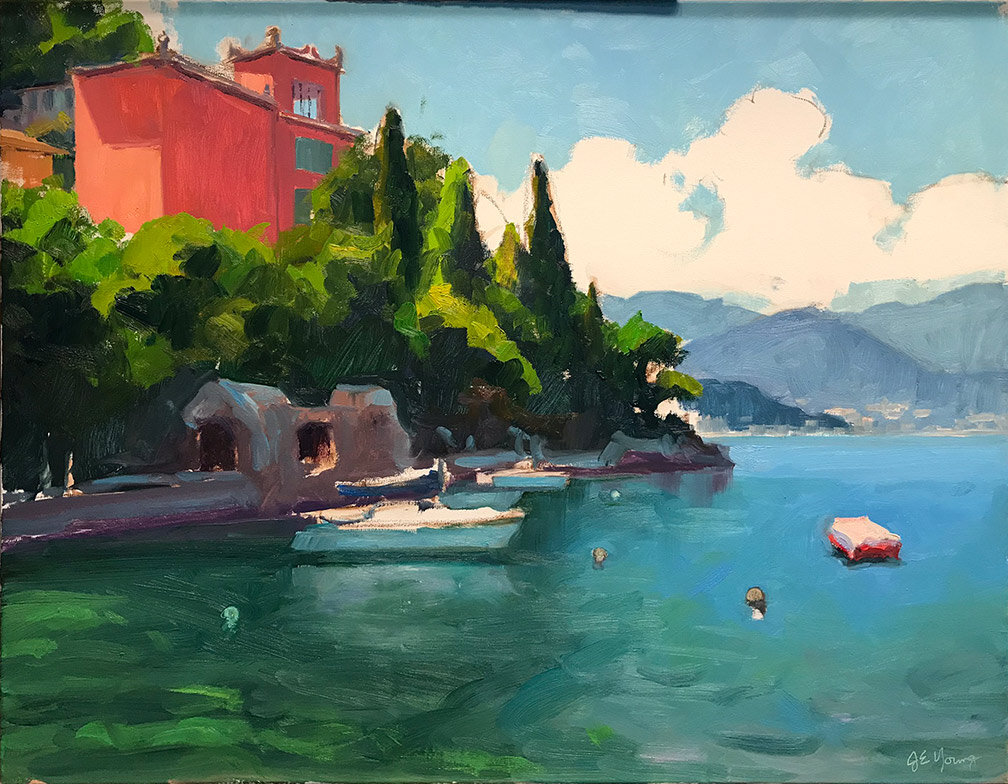
At this point I am going to sit with the painting for a day or two and may “tweak” it here and there, but I am close. I will post the finished piece, (photographed in better lighting) when I do. ***UPDATE*** See the final painting here.

Lake Como painting progression

I am working on putting together a video post, but I have to get my 9 year old to help me with some of the technical side first.😅 So today I am relying on the good old fashioned blog post, sharing a step-by-step painting in progress.

I had such a good time with my last Lake Como Painting that thought I’d “laissez les bons temps roule,” (as the Cajun in me likes to say.) I chose a scene in Varenna from my photo archives, one of my favorite memories that now feels like both yesterday and a long time ago. I chose one of my favorite canvas sizes, a 24x30”, and a color scheme of jewel tones that always cheers me up.

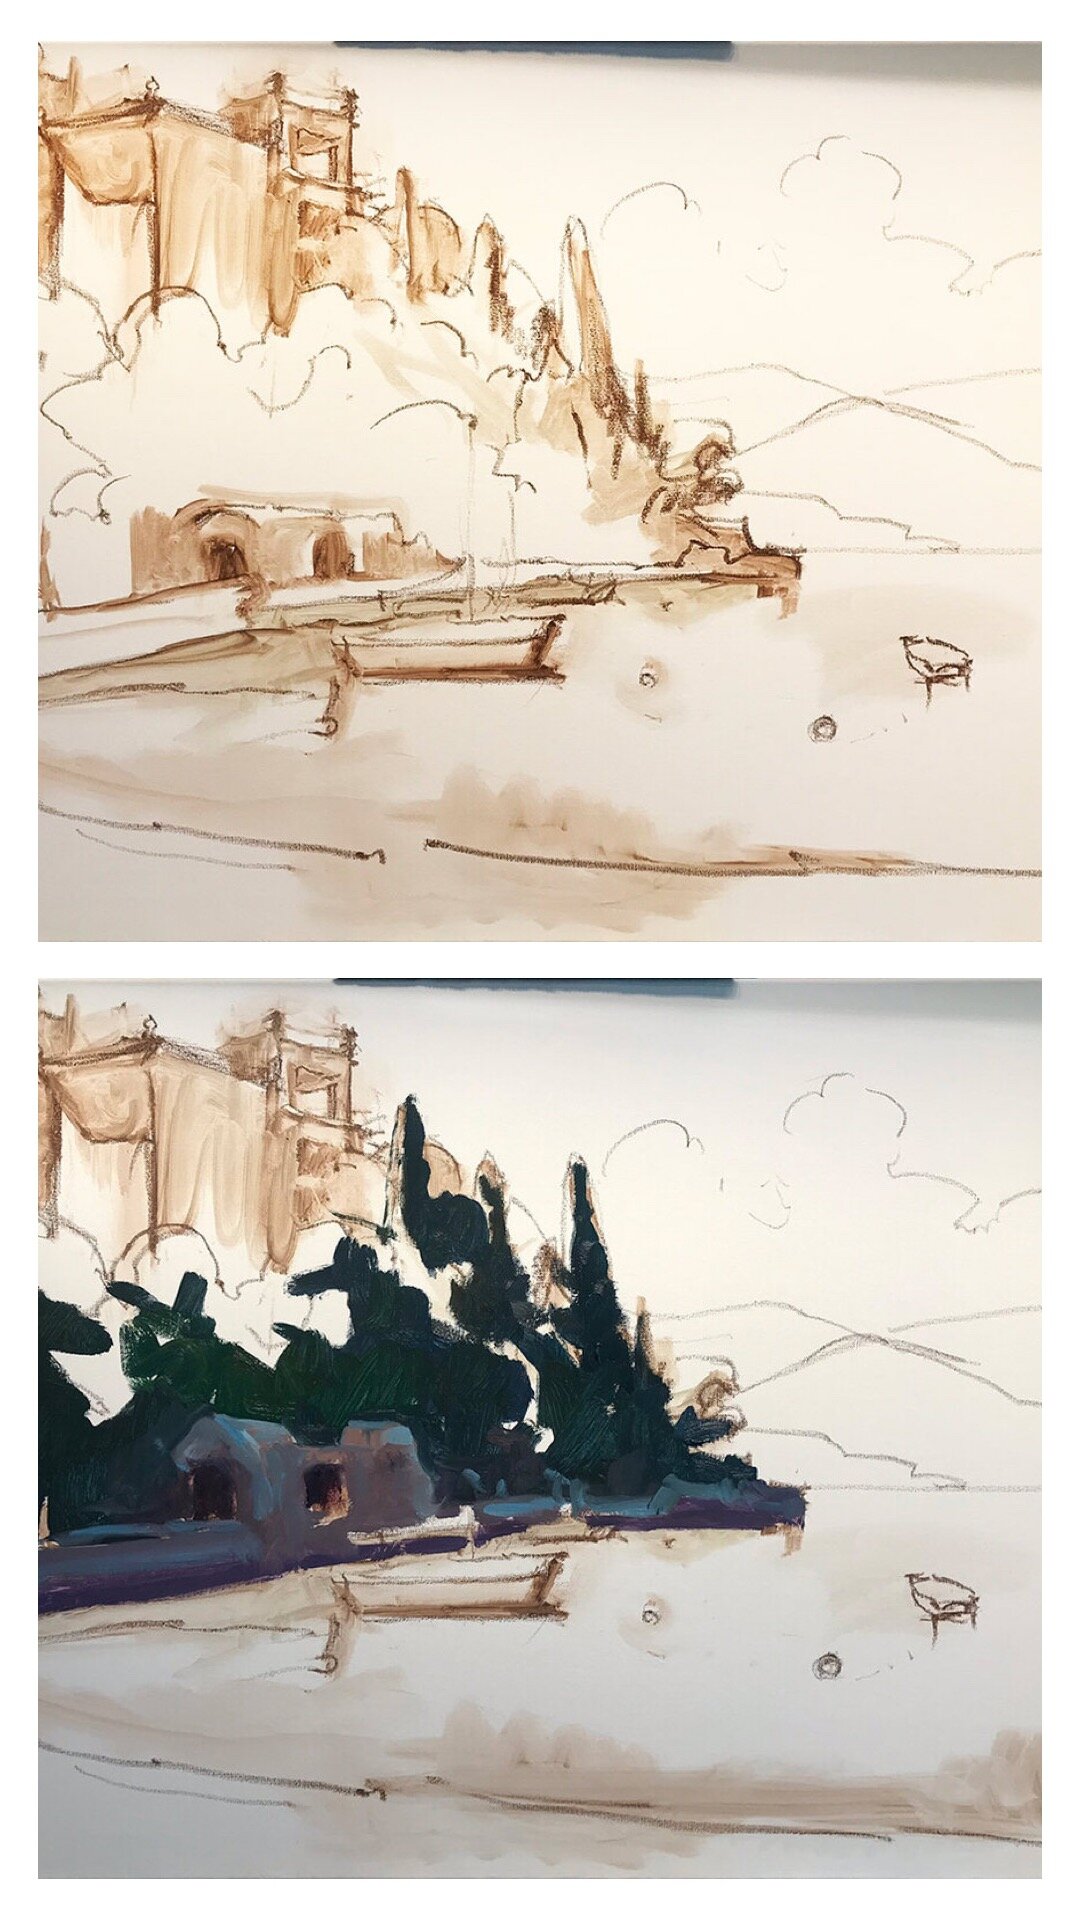
My starting approach for the last year or so is to just very casually sketch out my composition lightly in sienna oil pastel. The Sennlier oil pastel is so soft and lovely that it erases my change of mind with a very low stain, and yet allows me to indicate some shading at the same time.

varennasketch_jenniferyoung

Once I am more or less satisfied with my composition, I begin laying in some of the shadow areas of my painting, to get a feeling for the overall value pattern of my painting.

varenna_WIP_Jenniferyoung

I am generally trying to keep things very broad as I lay down the initial color. While not all of the water is “in shadow”, I decided to lay in the general color because I felt it would help me make a decision about the composition ( as you will see in the next photo.)

Varenna_Painting_Demo_JenniferYoung

My initial idea was to include the foreground shoreline with a couple of rowboats, but at the same time I wanted to keep the distant horizon below the middle point, which pushed the shoreline down. After laying in the water I decided the shoreline wasn’t really doing much for me or the composition.

Varenna_Painting_Demo_JenniferYoung

This is better, I think. Even working from photos in the studio, there is still a lot of decision making that goes into the process. You don’t have to be a slave to a photo and paint something in, just because it’s there in the reference. This is my painting, after all, and sometimes the best thing I can do for my work is to simplify. There may be a future painting with the shoreline boats as the feature, you never know, but sometimes it’s better to say one thing with clarity than several things with confusion.

At this point it was time to step away and make dinner, but I felt like I was at a good stopping point so this is where I left off last evening. I will still need to address the rest of that white canvas and make additional adjustments to the water and boats , but now I have a pretty solid idea of where I’m going next.

Edges, mark-making and tools

Happy New Year!🎉 Okay, granted I am a little late to the party, but I’ve had a busy couple of weeks moving into a new exhibit space for 2019. More on that soon, but today I wanted to share a bit about mark making, and neat little tool that I stumbled upon along the way.

I didn’t have tons of time over Christmas break to paint, but it doesn’t mean it hasn’t been on my mind. I have been thinking a lot about how I can loosen up, to create pieces that are truthful but not quite so literal. One of the things I struggle with is varying not only color but brushwork, so that there is not so much sameness everywhere. I vary brush sizes and shapes, but it still can leave me feeling a little bit like there must be something more. Sometimes I want to push a bunch of paint around and brushes alone don’t always do that.

Then one day, I purchased a Color Shaper. I actually bought this to spread gesso, because I have some pre-gessoed canvases that I bought that have been sitting around in my studio unused because are still a bit too rough and absorbent for my liking.

Before I even used it for gesso, I got curious. I had heard of other artists using these tools fairly extensively for applying paint in their work and I got to wondering whether it might be a useful tool for varying my edges and textures in my painting.

It didn’t really do what I was hoping for. These shapers come in varying degrees of firmness and the tool I ordered was an extra firm. Good for gesso spreading, but not for my painting. Still, I saw the potential so I went back online to see if I could get another one with more flexibility. But before I got that far, I stumbled upon these do-hickeys and fell in love.

colorshaper2.jpg

These guys, officially called Princeton Catalyst Wedges, are made of some kind of silicone or rubber and come in a variety of shapes . They are more flexible than my prior purchase but still firm enough to move the paint. They don’t have handles, but frankly I prefer this handle- less variety because it allows for more control.

What does it do? Well, for starters it pushes a heck of a lot of paint around, creating the ability to make bold, impasto passages or thinner, more ethereal ones.

coralsunset_detail.jpg

I can use it to make a fairly straight edge with the straight, thin side of the tool, or use it t scrape down passage to create softer edges.

coralsunset_detail2.jpg

I can use it as a blending tool, or a tool to separate out colors and make them stand out. In short, I can use it to exploit the properties of the paint in a way that is a nice variation from straight-on brushwork .

I first ordered the white tool, pictured above, left. Then then I discovered the black, which I like even better because you have greater versatility with both a long and a short edge. “Why not just use a palette knife,” you might ask? Well, I do love palette knife paintings but I always just end up switching back to brushes and reworking them because I have never been quite able to achieve that combination of softness and boldness I aim for. These little tools act like palette knives with more of a brush feel, if that makes sense.

“Coral Reflections, Late Summer”, Oil on linen, 24x36” ©Jennifer E. Young

“Coral Reflections, Late Summer”, Oil on linen, 24x36” ©Jennifer E. Young


I’m still not ditching my paint brushes; they are the work horses in my studio. But I’m having fun playing around with these new tools and exploring what I can do with them in my paintings.

Plein air odds and ends

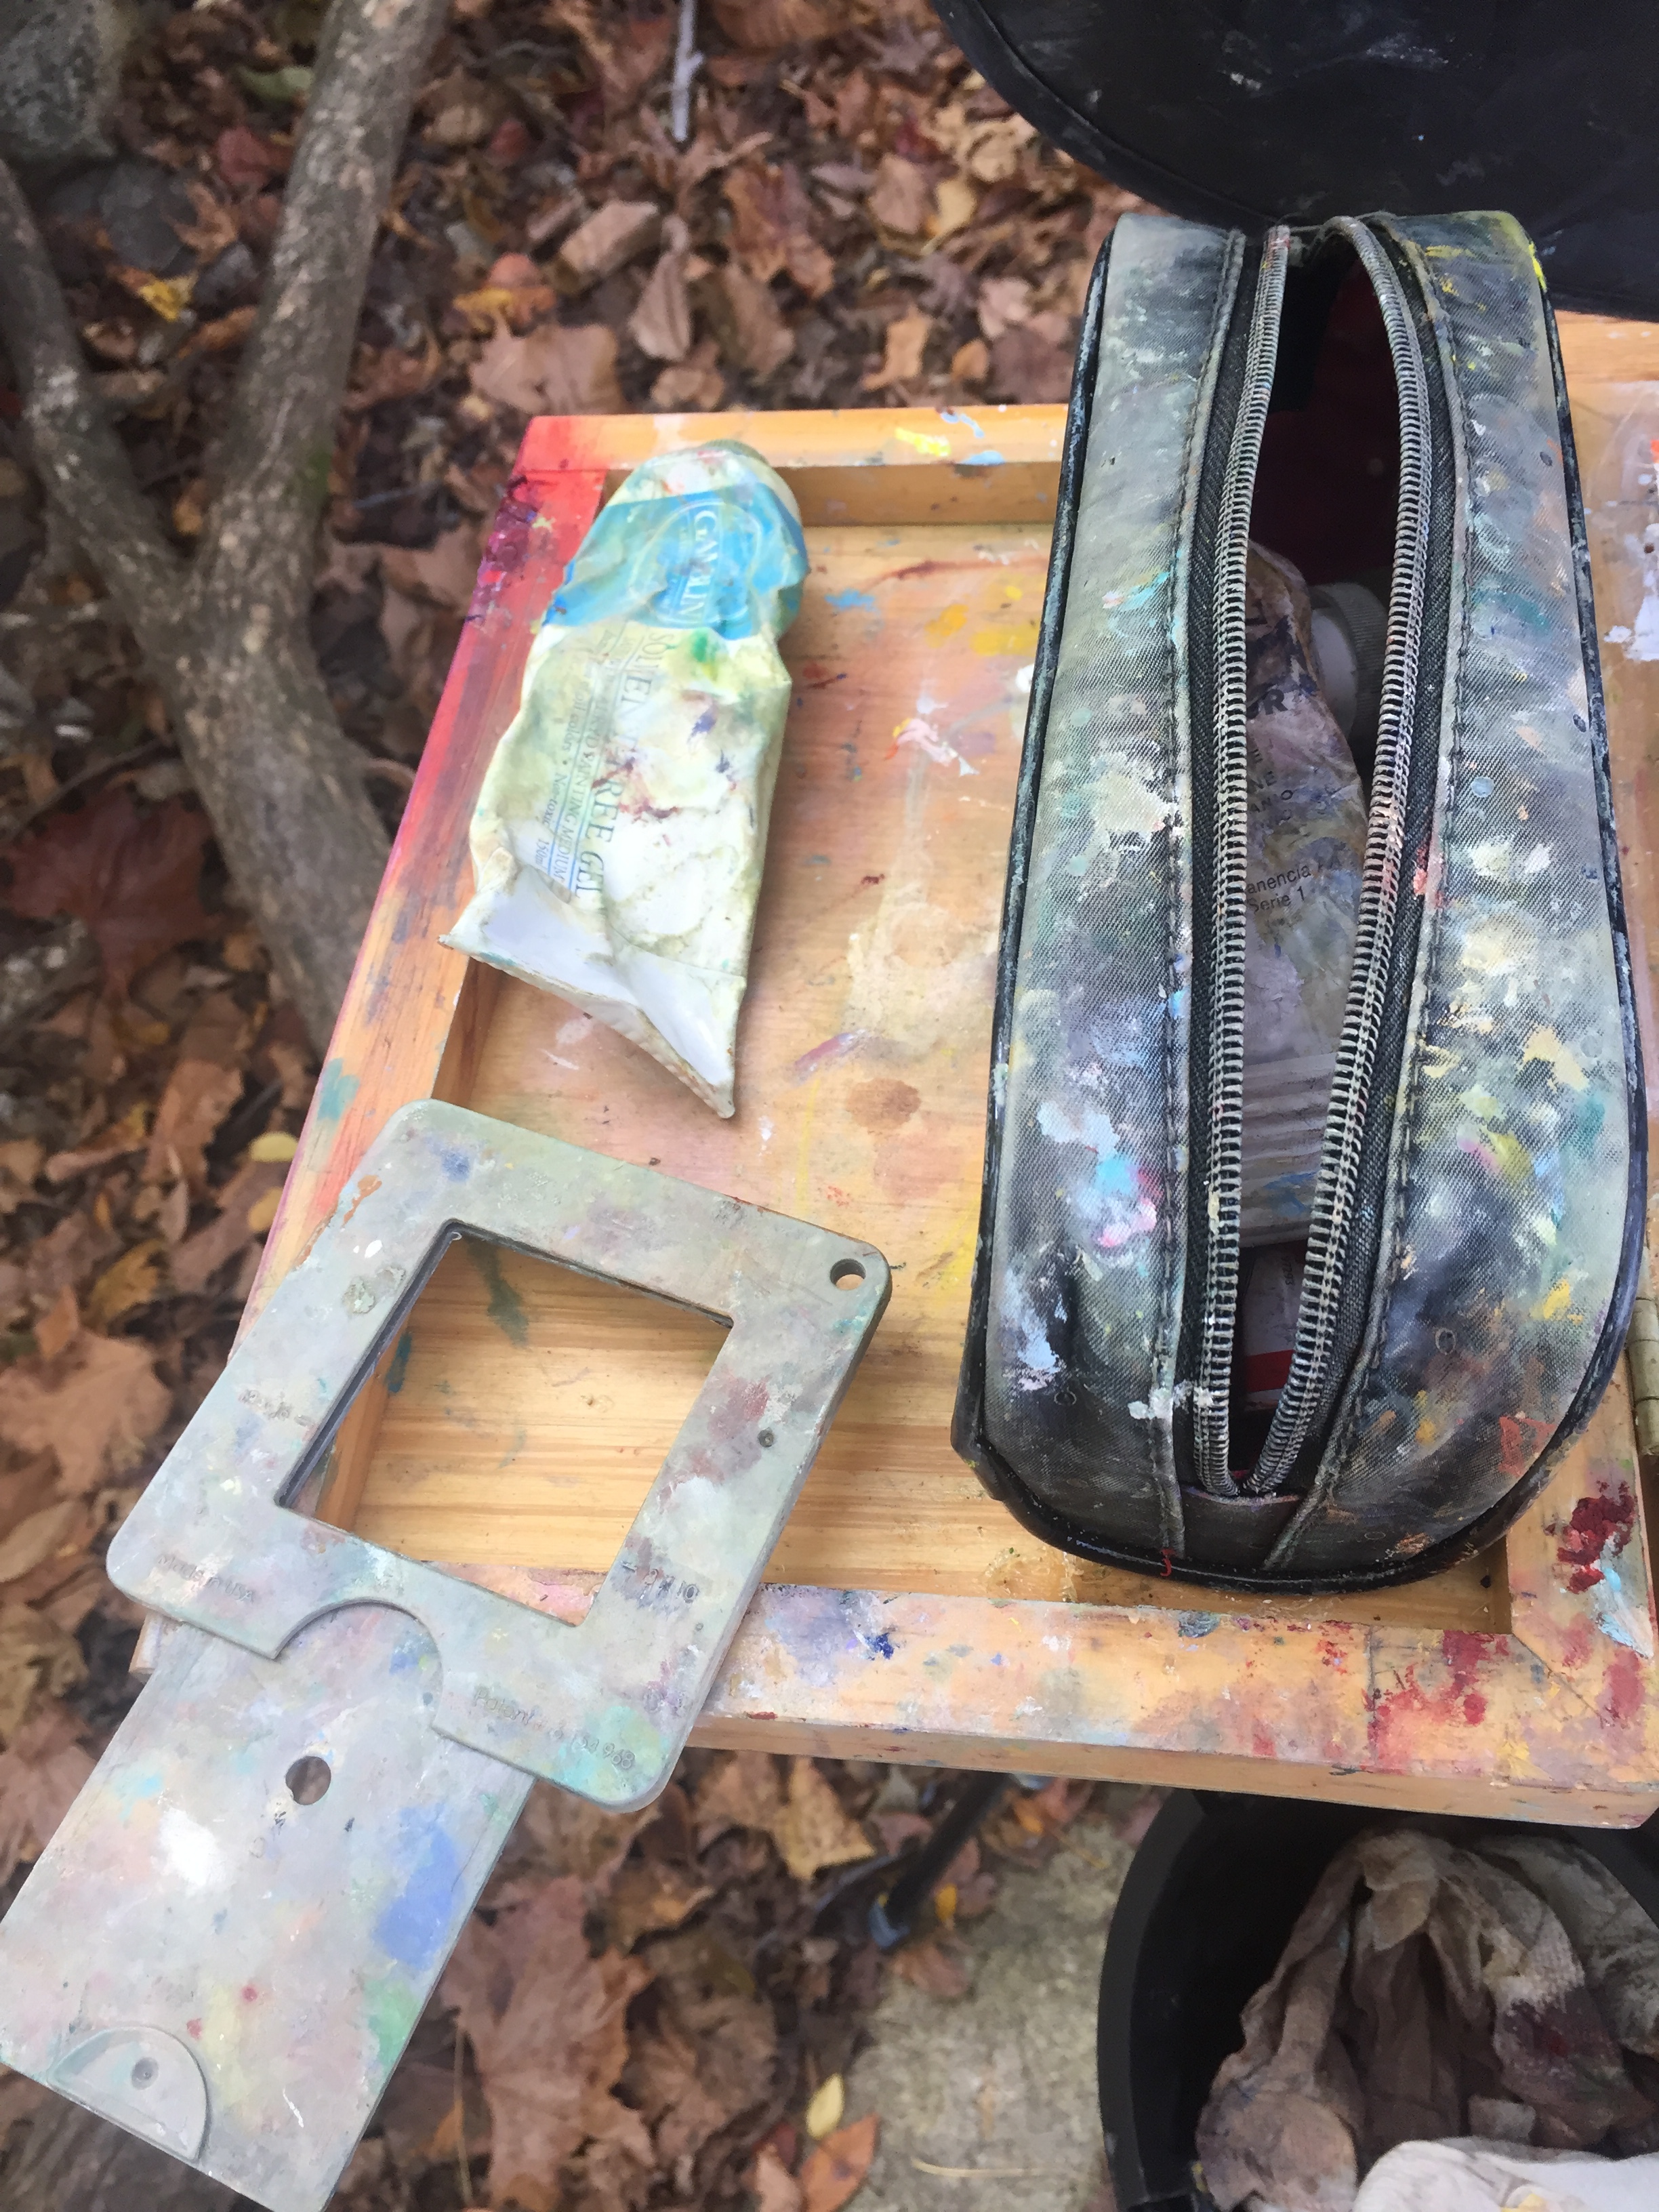
In this post I thought I'd share a little about some of the tools I carry with me in my plein air pack. Some are specifically designed for the plein air artist, and some I have co-opted for my own nefarious purposes. ;-) This first photo shows a picture of my current setup: 

55C537F3-E39E-415D-BB8B-0EB07B466242.JPG

My paint box is one I have mentioned before, but I love it so much I will say it again! It's the Coulter Easel. It is so quick to set up and simple to use. It has lots of work space for color mixing as well. Mine is the Compact model. Coulter's site offers other sizes as well, but I felt that this model was the most versatile for me as while it is lightweight, it doesn't compromise valuable workspace. As for the other items in this photo, I will list them in a clockwise manner. 

  • A mini sun shield that closes up flat into a small circle. I use this to cast a shade on my palette so that I don't get the glare of sunlight on it. I do have an umbrella, but many times depending on how I position myself, this little shade is all I need. When I do find the need for an umbrella, the model I use is Bestbrella. It works great for me.  
  • An envelope-style brush holder.  Called a "brush wallet", this style brush holder comes with a loop at the top, which I loop onto my tripod handle. I like this brush holder because I can tuck this in behind my palette and have my brushes handy without taking up space on my paint box. (*Note- I couldn't find a source for my brush holder. I bought it a number of years ago and I am thinking I bought it from
  • A couple of zip-up pencil bags to carry my paints. In one I carry my large tube of white, my mediums (more about that in a minute) my paint scraper, and palette knife. In another I carry all of my other oil colors.  
  • A bungee cord to hold my paper towels. The hooks on the bungee loop right over the lip of the paint box.  
  • A mini trash can. This is something I picked up in the automotive section of a big box store. Like the sun shield it also twists down into a little circle. It stays closed with an elastic band that is attached to the plastic rim. A plastic shopping bag will work in a pinch, but I prefer this style holder over the plastic bag because it doesn't blow around in the wind and remains open as I'm working. This little model came with a plastic loop on the top that I used to thread the bungee cord through, eliminating the need for clips or clamps.
  • Protective gloves for my hands. As you can see, by my brush handles, I'm not the neatest painter around, so gloves are a must for me. I became allergic to both latex and nitrile gloves, so the gloves I use are actually food grade gloves by Platex. They are the only semi-sturdy gloves that I don't react to. They actually hold up great. One benefit to these gloves is that I can get them in the grocery store when I'm grocery shopping, so I don't have to make a special trip to the hardware store when I run out. 
  • A small cat food can. I use this little can to hold a small amount of  Gamsol that I use to thin my paint in the very beginning stages of painting. I just pour in a little amount at a time, so when I'm done painting for the day I can just wipe out the can and pack it away.
  • A small eyedropper for holding the Gamsol. I'm using an eye dropper because it's small and it's what I had on hand, but any small solvent-safe container will do. Gone are my days of carrying around those heavy metal turp containers.  Check the next photo to find out why. 


0373A855-E584-47C9-9E73-CB049F8AC3D2.JPG
  • Gamblin Solvent-free Gel. Okay, I am not painting completely solvent-free, as I prefer a thinned-down , lean application in the beginning for my preliminary drawing. I use Gamblin's Solvent-free Fluid in the studio, but I prefer the gel in my plein air pack as the fewer liquids I have to worry about spilling the better. You can even use this stuff to clean off your brushes between colors and just wash them all up with soap and water back home in the studio. 
  • A view finder. There are various offerings on the market, but I prefer this simple model. The little lever moves up and down to change the proportions. Several popular sizes are marked on the view finder (9x12, 8x10, 12x16, Etc.) The little holes in the view finder also serve as color isolators as well. 

This is not a comprehensive list but it covers most things. There may be a few other odds and ends to discuss, and if I come across them I will definitely share them here on the blog. 

James River plein air

Oh happy day! Oh cold morning; but nevertheless, happy day. This week I finally managed to get back outside, to visit one of my favorite painting muses, the James River. The James River Park system in Richmond, VA, continues to fascinate me and remains one of my all-time favorite plein air painting sites.

*SOLD* Autumn Morning on the James River", Oil on canvas, 6x8" ©Jennifer E Young

*SOLD* Autumn Morning on the James River", Oil on canvas, 6x8" ©Jennifer E Young

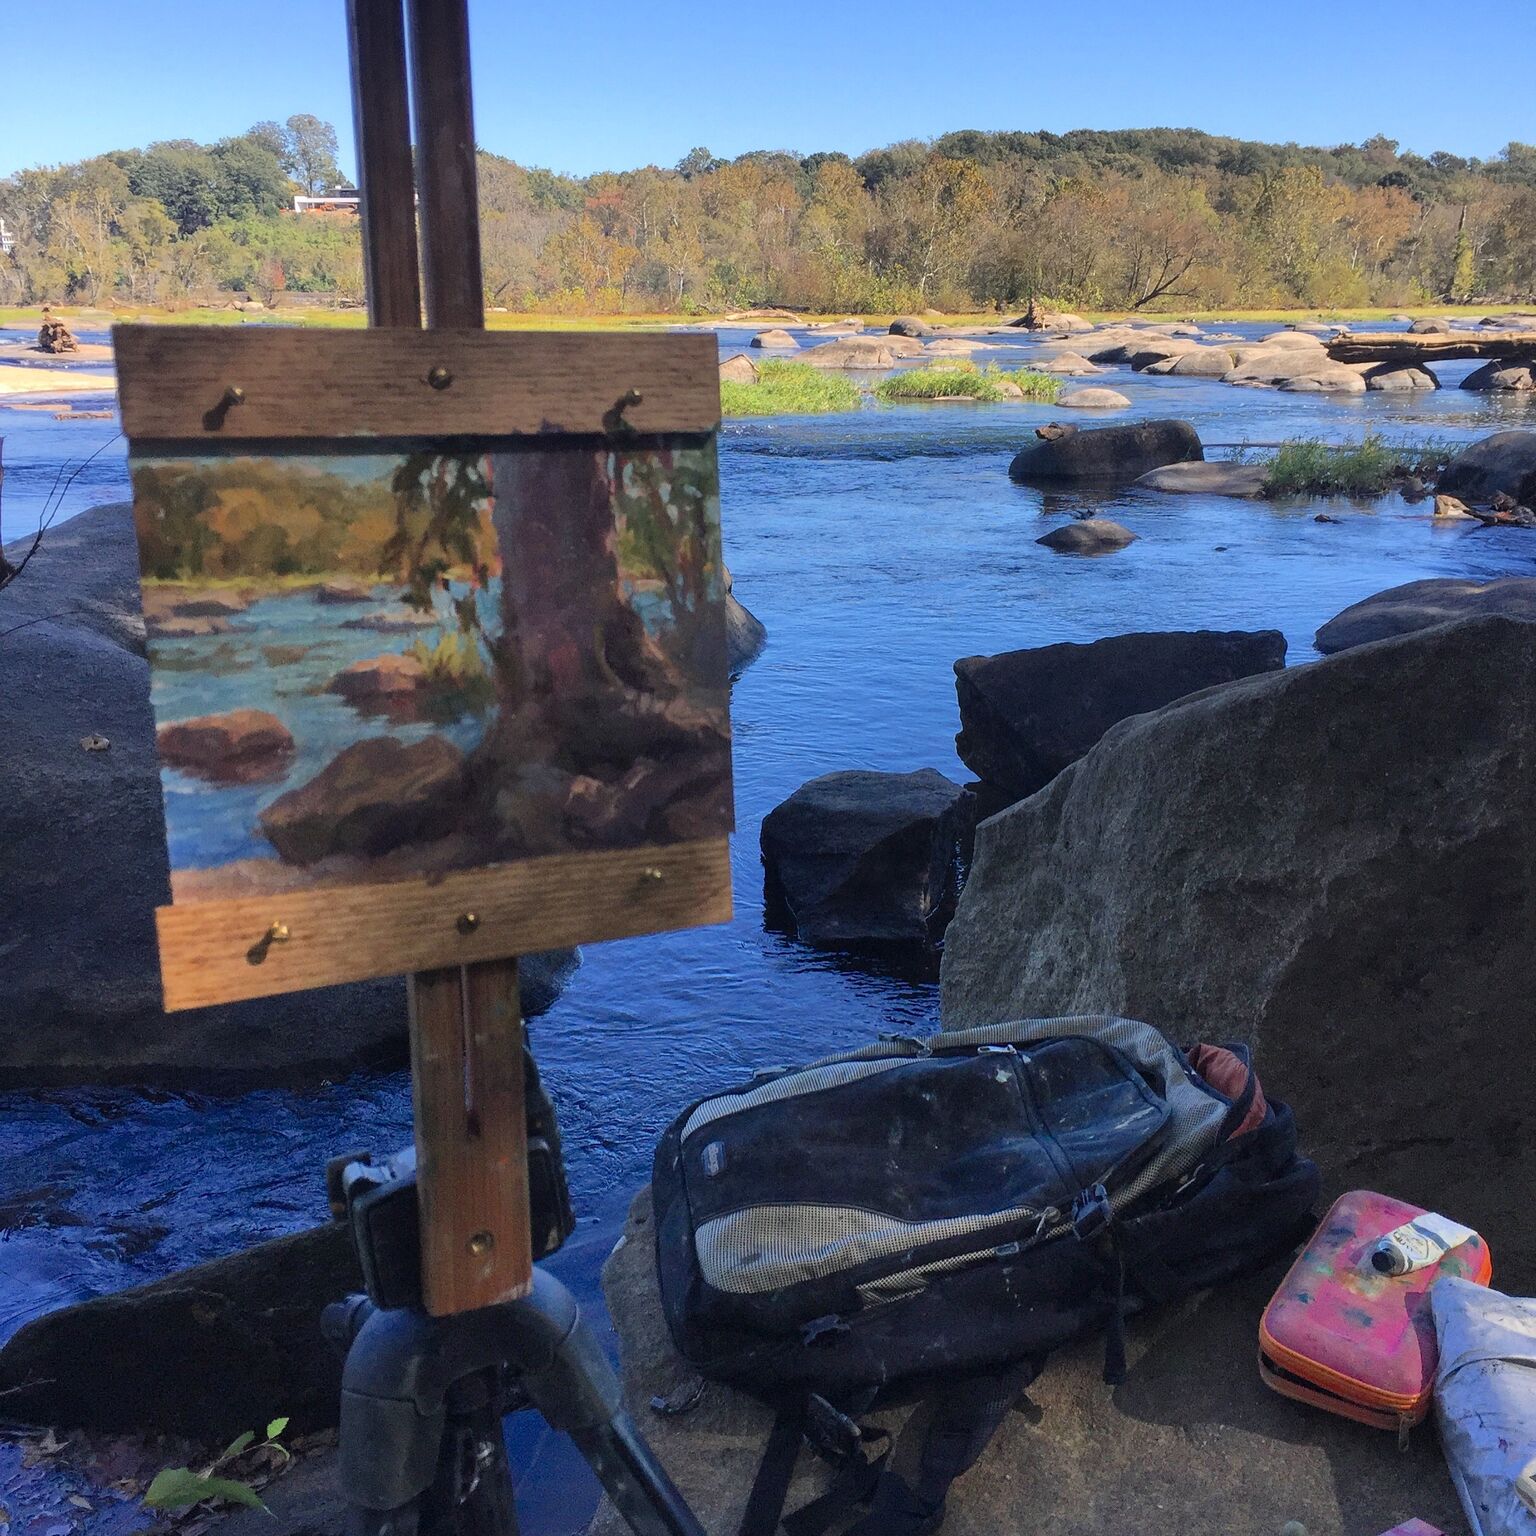
I painted this at Pony Pasture, where I stood wedged between some boulders.

jamesriverpleinair_jenniferyoung

Pony Pasture is on the south side of the river, in Richmond VA. I've always wondered where this part of the park got its name, but only today did I think to look it up. According to Richmond.com, "The name came from the 1960s when the area was suburban and people who were into housing their horses near the river," said Ralph White, who is the (now retired)  manager of the James River Park.

While there are no ponies today (though what a cool sight that would be) there are plenty of other creatures to observe, including Canadian geese and herons, as well as dogs and their owners, fishermen, kayakers and canoers. Oh, and you might occasionally see the odd painter too. ;-)