Shopping local

As the title of my blog might imply, one of my passions is to travel and paint the beautiful places I've been. But home commitments these days often don't allow me the time needed to go farther afield for scouting subjects and painting them. Instead of lamenting this fact (which I admit I did for a while) I have decided that if I don't find some options for painting close by I will not get very far with my work (or my sanity!) So I've started shopping local. I really only have a few mornings to myself so I need to get in and out of a place pretty quickly in order to pick up my daughter on time from preschool. The Lewis Ginter Botanical Gardens are close by, and they are a lovely option, as is Bryan Park. But there really are a lot of interesting subjects even closer to my home, in my Bellevue neighborhood and even my very  own gardens.

Jen's gardens
Jen's gardens

There are a couple of challenges to my place. First of all, I live in an urban neighborhood. While we have tons of gardeners here and lots of green space we also have small lots and lots of large trees. So you have to get used to painting close in, and you're not going to get many sweeping vistas around here, which is the kind of subject matter that I have been most attracted to since I first took up landscape painting.

Secondly, aside from a very brief (but lovely) appearance of sunlight in the early, early morning, a good part of my back yard in particular remains in shadow until about 10:30 or 11 a.m. That means that the most interesting play of light and shadow only makes a presence for an hour, or at most an hour and a half tops,  before the shadows shrink up and burn off at high noon.

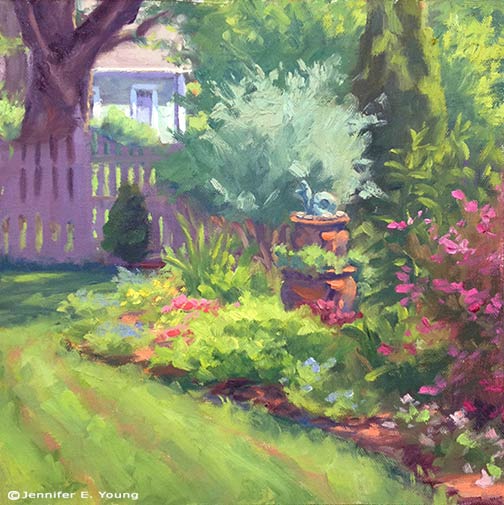
On the other hand, having planted every shrub and flower,  I know my garden intimately and  have had plenty of time to observe how the light comes over each bed. So I can set up my easel where I want it, walk back to the studio to do some work there, and then return to my plein air setup at the optimal time when the light is just right. I can work in this way all they way until the time I need to pick up my daughter from preschool (a 5-minute commute), and then just throw my gear into the studio right before I leave to get her. This was my approach for the little plein air below. It's not a big painting, but I still needed to finish this up in two different sessions due to the lighting situation mentioned above:

"The Curved Bed" Oil on Canvas, 10x10"© Jennifer E Young

"The Curved Bed" Oil on Canvas, 10x10"© Jennifer E Young

At home we call this bed "The Bump Out", but I thoughtthat would be a weird title for a painting. At present there is still a sense of order, but in summer it's a lot more colorful, but also a lot more chaotic. ( I really tend to crowd my gardens terribly. This is a bad habit but I'm trying to get better, and not be so afraid to pull things out, give plants away, or just toss them if need be.) The summer flowers are beautiful, but  I like it at this time of year too because you can still see the "bones" and underlying form before the wildness ensues.

Lessons from the workshop

I thought I'd share a few of the studies I worked on during the Matt Smith workshop I posted about earlier this week. I will first preface by saying that my haste in preparing for this class came back to haunt me, so while I was well prepared in terms of my art supplies, I misunderstood what I was supposed to bring in the way of reference materials. The support documentation said to bring plein air studies and/or photos, and for some reason I took that to mean that plein air studies were preferred (maybe I was just hooked on the idea of plein air!) I probably should have asked beforehand about this because I did feel a little puzzled when I was packing about referencing a small scale plein air to make another small scale painting. (I usually translate small plein airs to larger works in the studio, but the recommended canvas sizes were all under 12x16"). In any event, I packed a number of my plein air pieces for reference, and then as a total afterthought printed off a few of my photos "just in case."

After seeing one demo and hearing the discussion though, I realized the error of my ways. I talked to Matt about what I should work from and he said he would rather see what I could do with my photo references for this class. Matt did bring a number of his own photo references for people to use, but I really dislike using other people's references. Even though we are composing with light and form, I want references that reflect my real experience of having seen (and felt) a place.  So I did what I could with what I had, but I really wished I had brought a more extensive selection of my hundreds upon hundreds of photos I have in my personal archive.

This  first painting is also the most incomplete:

In all of my paintings the common feedback from Matt was to take my brush and "knock back" some of my brushwork that competed with my statement or focal area. For instance, in this painting, our conversation went something like this:

MS:  "Is this painting about the light or shadows?" JY: "Well, I like the highlights on the edges of the poplar trees the best". And with that he took my brush and blended back the rather boisterous brushwork that was beginning to take shape in the shadow passages. MS: "You're giving equal weight to both." Next he mixed a bold tree highlight and swept it upwards on the edge of one of my poplar trees calligraphically, making the highlight really jump out. JY: "Ah, I see! But...I wouldn't just leave it like that...would I? It looks pretty unfinished." MS: "No, not necessarily. But you may restate and knock back several times before you get it right."

 I have such a love of brushwork, but it probably can work to my disadvantage sometimes. The hard part, I think, is figuring out what, exactly, is "right", and what is too little or too much. It's all about finding that balance, where active areas are juxtaposed with quiet passages. It's the quiet passages that play a supporting role and allow the more active ones to take center stage. To paraphrase something Matt said in one of his talks, it can't all be "important". Filter the noise and find the important elements.

I soon abandoned the first study, deciding to just keep that as an annotated lesson.  The second 8x10" painting below is more complete, and may look familiar to some long time blog readers. That is because I painted this scene before en plein air, and blogged about it here. The photo in the link is too dark overall but even so, I think this second study is much more infused with light. (So this exercise will be very helpful to me when I translate the concept to a larger painting, which I really am excited to do now! ) For the painting below, though,  I thought I'd try it again using just my photo reference and see what kind of feedback I could get, and whether it would look decidedly different as a result.

"Rooted II" (Study) Oil on panel, 8x10" ©Jennifer Young

"Rooted II" (Study) Oil on panel, 8x10" ©Jennifer Young

I really loved the composition as it was, so it remains relatively the same in this second attempt. But in terms of paint application,  I got some helpful hands-on feedback from Matt again. Again he took my brush and knocked back the brushwork of the distant trees to make them sit back more and look less stylized.  Fair enough. He then demonstrated "opening up the shadows, using reflected light cast from nearby objects to cast color into the shadows. He put a touch of blue, for instance, on the shadow side of the tree trunks reflecting the water, and the warmer tones reflecting warmth from the stones or earth. That was awesome. After that he showed me how an assertive hand used to apply just a few intense highlights could suddenly make the painting pop. I reworked some of what he put in but played with those general ideas. But that rim light of his along the trunk and the 3 or 4 dabs of bright green paint on the tree leaves remain just as they were applied. (And don't they just sing?)

I felt I was finally getting somewhere on this final painting (below), though we had some helpful discussion early on about using perspective to direct the viewer to the focal point. He again knocked back the distant mountains with no paint, just several swift blending strokes (sigh.)  I don't consider this painting really finished either but I love the composition and I think I would like to try this again on a larger scale. It's the Dordogne as seen from the top of the Chateau de Beynac.

"Dordogne River" (Study) Oil on canvas, 9x12" ©Jennifer Young

"Dordogne River" (Study) Oil on canvas, 9x12" ©Jennifer Young

I think overall his main critique of my work was that he wanted to see both more paint and a more deliberate, assertive handling of paint. And it's really hard to do the latter without the former. As he put it, you need to have enough paint there so that it expresses the character of the medium. Otherwise you need to ask yourself, "Why are you painting in oils?"

The class was listed as an intermediate-advanced class and I felt the instruction and the students lived up to that. I left the class pretty exhausted but with a lot to think about on my 6 hour drive back home. It will be interesting to see how I can apply Matt's feedback and insights to my work, while still making my paintings "mine". Once or twice the feedback was hard, but I soon realized, as with any class, it's important to leave your ego at the door and come with an open mind if you really want to learn.

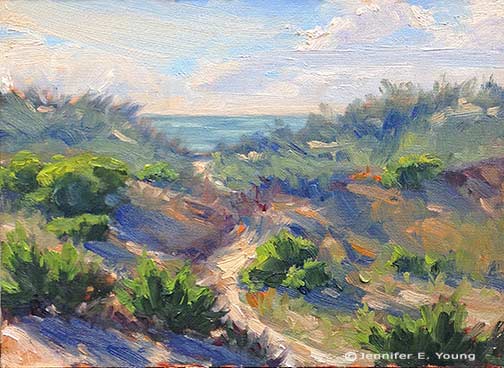
Hatteras Island study

I once had a painting of the Outer Banks that I loved; but for whatever reason didn't sell. It was in my inventory for a number of years, so instead of confining it to the bins any longer, I decided to embrace the fact that I still had possession of it. In fact, I decorated my bedroom around it, painting the walls a beautiful soft gray color that perfectly picked up some of the muted tones in the painting. Unbelievably, two weeks after I had my beautiful "new bedroom" complete, I received a call from a collector asking if it was still available. Yes, I sold it. I am trying to run a business, after all. I do have one or two pieces that I am trying to keep for myself, but for the most part, I'm just not one to turn down sales. So what does this have to do with the painting below? No, it's not the "one that got away" (you can see that one here). This piece is one of a few studies I'm working on in preparation fora large new painting I intend to hang (at least for a little while) in my now repainted bedroom. Well,  I had a nice big gallery wrapped 30x40" canvas, and a nice blank wall, so I figured, why not?

"Hatteras Dunes, Study I" 6x8" Oil on Canvas Jennifer E Young

"Hatteras Dunes, Study I" 6x8" Oil on Canvas Jennifer E Young

This study is based on two different plein air paintings I did on Hatteras Island on recent family vacations. I am largely basing my composition on a piece called "Hatteras Island Dunes II". But because that painting was 8x10" (a 4:5 ratio), I have to make a few compositional changes to format the new piece to a 30x40" gallery wrapped canvas (3:4 ratio).

As you can see in this new composition, I have changed the direction of the sandy path that leads to the beach and rearranged some shrubs somewhat. I also felt like I wanted a bit more sky showing than in the plein air, so I have lowered the horizon a touch to allow for that. For the sky I am loosely referencing both the above mentioned plein air, as well as another plein air piece from last summer, which you can see here.

I don't seem to have any actual photos of these scenes to reference, so my sole references are my plein air paintings. This is a bit different for me as I usually use both a photo source and my painting when I work from plein air to studio. So it will be interesting to see if I can make this fly! My plan is to try at least one more study before launching into the big canvas, but this is a good start.

The Potted Garden, Pienza (painting complete)

With school out for the Thanksgiving holiday, my studio time has been a little dicey. But now that we are back in session I have managed to wrap up my posting about the Pienza painting from earlier last week. Before I dive into painting the potted plants, I finish up the main architectural features of the painting-- the final touches on the windows and doors, and completing the distant bench.

 Now let's move onto the flowers!

Here is the final:

"The Potted Garden, Pienza" Oil on panel, 12x12" ©Jennifer Young

"The Potted Garden, Pienza" Oil on panel, 12x12" ©Jennifer Young

The hill town of Pienza is lovely for a number of reasons. First, it overlooks the gorgeous Tuscan valley called the Val d'Orcia. Second, like so many of these small towns,  the whole village is oozing with charm and dripping with flowers, just like the scene I have painted. Third, it is the home of Pecorino cheese! Need I say more?

New Key West auction posted!

Congratulations to Barbara T. for winning this auction!

"The Shady Side" Oil on canvas, 6x8" ©Jennifer E. Young

"The Shady Side" Oil on canvas, 6x8" ©Jennifer E. Young

When things heat up from the tropical sun, a shady veranda is just the thing--especially if that veranda is in Key West, and you can imagine yourself there sipping a nice cool beverage! This little painting of Key West conch houses may help you to do just that.  Now is your chance to win a slice of sunshine for yourself, at a great price! This original oil painting on canvas panel by Jennifer E. Young measures 6×8" (a perfect size to fit under the Christmas tree!) Unframed, it is signed by the artist, lower right. To begin bidding, enter your bid in the auction module in the sidebar of this blog. Here’s how it works:

  • All auctioned items are offered unframed.
  • The opening bid for this painting is just $100 (a fraction of my retail price).
  • Bids increment by $25
  • Highest bidder at the auction’s end wins the painting.
  • When the auction has ended, I will send the winning bidder a Paypal invoice.
  • I ship via U.S. mail within 3 days or less of receiving cleared payment.
  • Free shipping in the continental USA!