Sant' Antimo (Tuscany) painting complete

It took longer than I would have wanted to finalize my latest landscape painting of Tuscany, but I am really pleased with the final. Picking up from my prior post about this painting, here are a couple of additional progress shots: Continuing work to further articulate the background landscape:

pathtosantantimowip_jenniferyoung.

...and here I begin to work on the Abbey:

pathtosantantimowip2_jenniferyoung

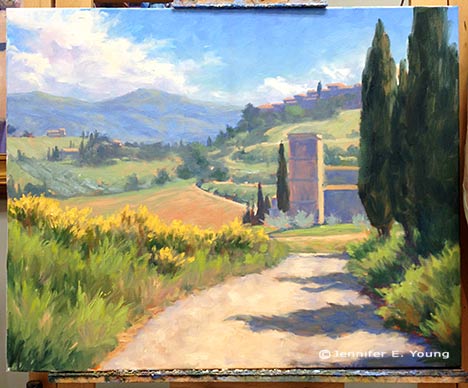
Here, at last, is the final!

"Path to Sant' Antimo" Oil on Linen, 24x30" ©Jennifer Young

"Path to Sant' Antimo" Oil on Linen, 24x30" ©Jennifer Young

Sant' Antimo Abbey is a beautiful Romanesque (formerly Benedictine) monastery dating back to the 1100's. It is situated in the stunning landscape of the Montalcino commune, and rests about 10 km from the town of Montalcino, (home of the gorgeous Rosso di Montalcino and Brunello wines).

In springtime the landscape of Montalcino and surrounds are strewn with poppies and other wildflowers, and the hillsides are often touched with the soft yellows and greens of golden broom.

I have a lot of reference photos of this abbey from my visit there several years ago. But I particularly like this view, which shows the focal point as a hint of the abbey in its lovely setting, but doesn't scream "portrait of a building". I also enjoy the point of view, which puts the viewer firmly on the pathway beneath the tall cypress trees, and nearly eye level with the abbey, adding to the sense of "being there".

Sant' Antimo painting W.I.P. (cont'd)

I thought I would share a progress shot of the painting of the Montalcino valley (Tuscany) I've been working on. I have been under the weather, which delayed my progress for a few days. But now I think I'm getting back on track.

Tuscany landscape painting in progress by Jennifer Young

I now have the whole canvas more or less blocked in. I decided to remove the tree foliage that I'd indicated  in front of the abbey because I felt it hindered rather than added interest. I had to refer to a few other photos I had taken from different angles to figure out what is behind there, but I think the change opens it up a bit and things make more sense overall. I hope soon to be able to share the final piece....I'm getting closer!

Painting my garden

The gardens around my studio and house are really picking up steam with summer blooms. I think it's best described as a cottage garden, and borders on chaotic at times. This is the same spot I shared with you in early spring...much improved now, I think!

20130710-151020.jpg

My little "fountain" of succulents in the garden opposite the studio is now surrounded by a flowering butterfly bush, purple cone flowers and towering lilies (just about to bloom) And here's Ted, alternately my garden cat and studio cat. He likes to support me whenever I am being industrious:

ted

With such an easy access garden, you'd think I'd paint it a lot more often than I do. I mean, you really can't get any more convenient when it comes to a plein air painting location! But there are a couple of challenges to overcome. First, the light moves pretty quickly in my little oasis,really only remaining constant for less than 2 hours. Inevitably even small paintings seem to require more than one session. Secondly, while I do have some painting time during the week while my little girl is with a sitter, any time she sees me painting outside she wants to "watch" (which quickly evolves into wanting me to push her on the swing, blow bubbles, etc.)

Nevertheless, I did get an opportunity over the July 4th weekend to complete this painting in the yard while Dad distracted DD:

"The Cottage Garden" Oil on panel, 12x9" (SOLD) © Jennifer E. Young

"The Cottage Garden" Oil on panel, 12x9" (SOLD) © Jennifer E. Young

Caring for oil paintings- some tips!

I recently received some questions from a new collector on how to care for her oil painting, so while I have discussed these issues here on my blog before, I thought my readers might also find a refresher helpful . I personally feel that oil paintings are much easier to care for than works on paper, but there are some guidelines to follow to ensure your painting receives a long and happy life.

I frame all of my oils without glass, as a canvas painted with oils that has adequately and properly cured is quite a bit less delicate than works on paper, which are more prone to deterioration when exposed to the environment. Framing without glass is indeed, just one of the great advantages of oil paintings, as it eliminates the glare that can be created by the glass covering. If you feel, however, that the paintings would be subject to any unusual conditions, consult a professional picture framer (or better still an art conservator), as they are best suited to advise you on such matters and may indeed determine that framing under glass is best due to those conditions. If you do use glass for any reason, the framer should use spacers between the painting and the glass, so as to avoid having the painting surface in direct contact with the glass (which can be highly acidic.)

When transporting the canvases, they should be held by the edges, not carried by tucking your fingers under and between the wood frame and the canvas. Do not lean anything up directly against a canvas or allow the canvas itself to lean or touch another object as this may cause the painting to develop “dimples” or indentations. Avoid hanging the paintings in direct sunlight. I do use professional grade archival paints and canvases, but any artwork, no matter the medium, will be prone to fading if in direct sunlight for a prolonged period of time. Also avoid high moisture areas (like steam from a hot tub or a bathroom shower, for instance)  which can cause the canvas to expand and contract and the frame to warp, creating the potential for cracking of the paint surface. Really though, the greatest risk to a painting occurs during transport, so assuming it is properly packed and arrives in good shape, the rest of its care should be pretty easy and straight forward.

Sant' Antimo painting progress

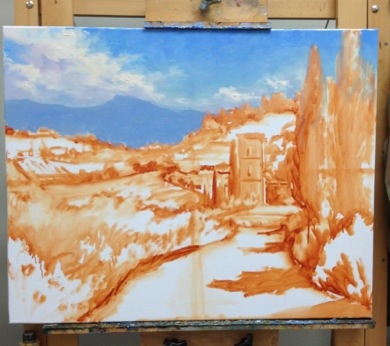
I thought I'd share a few quick shots of the Sant' Antimo Tuscan landscape I've been working on. The first color I lay in is the sky and clouds and distant mountains. The clouds will be the lightest value in the painting, so I want to "key" that in at the start.

Next come the darkest values- the majestic cypress trees so prevalent in Tuscany. At this point I also establish a rough lay in of the shadows of the abbey and cypresses:

Once that's done I set about fleshing out the rest of the painting. No highlights on these areas yet. But I am establishing some of the wonderful patterns in the terraced hillside and distant landscape.