Paintings Thoughts and Process ©Jennifer E Young
Bellagio From Above--Redux
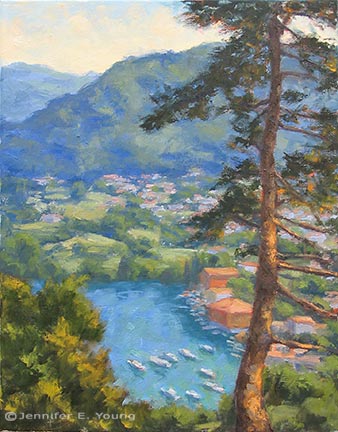
/The painting below was completed a while ago and has been sitting in my office since the move to our new home. So I have had a lot of opportunity to look at it lately with new eyes:
Version 1
While I liked the painting before, I felt it could be improved and opened up a bit more to give this view a little more breathing room. So I looked back through my image archives from my trip to the Italian lakes and found several different views from this approximate vantage point. I then followed my own guidance and decided to play around with the composition in Photoshop to see "what would happen if..." I really wanted to capture more of the beauty of the lush blues in the lake and the mountains beyond:
Of course, one change lead to another and my minor edits became quite a re-working. I oiled out the areas I wanted to repaint, and then set to task. This doesn't always work for me, as sometimes the paint layers have too much " skin' or texture, but this time around I guess the paint was more evenly applied. I really like the way this turned out! It is much more aligned with the concept I had from the start- only now a little better executed.
Morning Surf
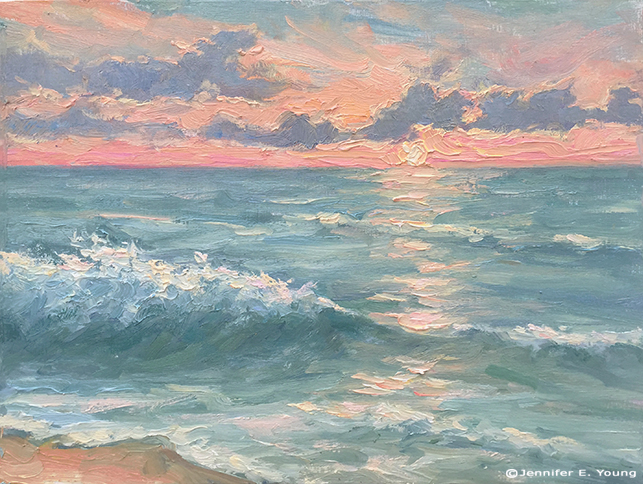
/Immediately after I wrapped up painting my sunrise painting, I turned to look up the beach toward the pier and noticed how lovely the waves looked lapping up on the curving shoreline. So since I finally felt like I was getting somewhere with these paints, I decided that this would be a back-to-back session, one piece after another. Here' s the beach in early morning, post sunrise, around 8:30 a.m. or so:
For this painting and the prior sunrise one I had to lay the paint on pretty thickly to manipulate the edges the way I wanted. Also I found the titanium white and cadmium yellow light were much less intense than what I was used to with my traditional oils, so the highlights were painted very thickly indeed. I hadn't noticed this in my first venture with the Water Soluble oils, but it became much more apparent with these beach paintings because they are pretty high key. Overall the effect seems to me to be closer to a palette knife painting than one done with a brush, though hog bristle brushes were all that I used.
I really enjoy painting the surf. While I have done it before a number of times in the studio, these pieces were my first effort done completely from life. What a rush! I feel like I could spend a lifetime studying just this one subject...I should be so lucky.
Back from the beach
/Last week my family made our annual trek to the Outer Banks of North Carolina. It is a trip I look forward to all year, and it always seems to be over all too soon. For this trip, I brought along my water soluble oils. Given all of the moving and excitement we had this spring and summer, I thought I would simplify things a bit with the painting gear I chose to bring with me, and eliminate the need for carrying turpentine. The only problem with my little plan was that, unlike my first foray into this medium, I found myself struggling. A lot. I don't know if it was the humidity, the painting surfaces, my overall fatigue or what. But every painting I did all week was a complete wiper, in spite of my most valiant efforts. The paint seemed to completely lack body and intensity. It also seemed to do nothing but smear all over my surfaces when I applied them.
Finally on the night before the last full day, it dawned on me that I should try a more absorbent surface. When I paint with traditional oils my preferred surface is one that is quite smooth --a fine weave linen or a shellacked birch panel. It was my understanding that shellac wasn't going to fly with water soluble oils, and my linen wasn't doing the job at all. So I dug around in my supply of panels and came up with a couple of gessoed birch panels and a Pintura gessoed canvas panel and decided to throw the old Hail Mary on the final day.
Here is the first piece I did that last day, at sunrise:
Finally I painted 3 pieces that I actually felt happy with! The paint was still harder to control than my beloved traditional oils, and I had a harder time mixing the colors I was aiming for, but at least the paintings actually looked like something I could show and/or use for reference when painting larger pieces. I will post the other paintings from that day in the coming days. Stay tuned!
Color isolator
/My 5 year old and I have started playing a little color game called, "What color is that exactly?" I'm trying to show her that colors are not always what they seem. The ocean may seem "blue", but which blue, exactly? And is it all blue? Or is it the same blue, from horizon to shoreline? One way to hone your color discerning skills is by using a color isolator. A color isolator is nothing high tech. It's basically a small hole that one can peer through to "isolate" a particular color from all others in a scene, in order to achieve better color accuracy.
There are little art tools sold to achieve this purpose, or you can peer through the small hole at the end of your palette knife. In a pinch you can concoct a small hole by peering through your curled up fingers. Last night at the restaurant my daughter and I were peering through straws. We even made a hole in a piece of my daughter's pita bread.
This worked really well, actually, though by this time my husband started trying to disassociate himself from the crazy people peeking at things through their appetizers.
The point is, by isolating a tiny portion of an object you eliminate the information overload that can often happen when painting outdoors, and it is easier to see the color and value more accurately.


