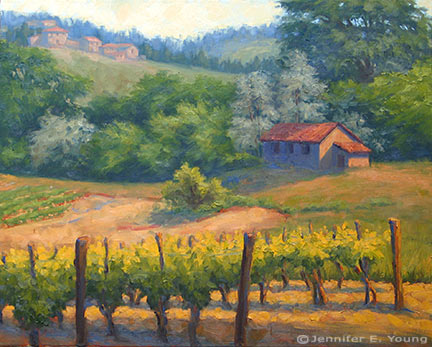
Tuscan Vineyard (remaining progress pics & final)

Here are the final images for the Tuscan Vineyard W.I.P. I have been posting about. Again, the progress images are not color corrected, though the final is. The linen canvas I used originally had a clear primer on it (as opposed to a white gesso). While it is an archival product, the surface seemed more absorbant, so I applied a couple of additional layers of my own white gesso (and sanded in between) to get the paint to sit better on the top. Even so, it still ended up with more of a surface texture, which compelled me to use a lot of thick paint. As a result, I had a really hard time photographing this painting because I kept getting glare in some spot or another.

Okay, now that I'm done with my disclaimers, I'll wrap this up! Having worked out my compositional problems, I next spent a good deal of time developing the treeline in the middle distance.

My aim is to keep the edges soft but defined. I want to lead the eye to the out-building, and not distract from it, so I put slightly more definition in the pale sivery trees directly behind the building.

Next I work my way forward again, to resolve the farmland around the building.

And finally, I put the finishing touches on the vineyard.

"La Vigna Privata"  Oil on Linen, 24x30" (SOLD) ©Jennifer Young

"La Vigna Privata"  Oil on Linen, 24x30" (SOLD) ©Jennifer Young

Tuscany vineyard W.I.P.

I spent some time late last week and Monday working on the painting I had sketched out in my last post. I will say before I begin, that these photos are not color corrected due to limited time, but hopefully you can still get an idea of how the painting is developing. Sketch in transparent oxide red, with some shading...

Tuscany painting work in progress by Jennifer Young

I usually lay in the sky first, but since there is so little of it in this painting, I have decided to start laying in the ground. More or less, I am working front to back.

Tuscany landscape painting by Jennifer Young
Tuscany vineyard landscape painting
tuscany painting in progress by Jennifer Young

At this point I had to step back and think about the plane trees I had sketched in on the upper right. As much as I love the plane trees, I was afraid they would be too busy in this painting, when there is already a lot going on. You might even be able to tell that I struggled with those trees from the outset, by all the transparent red oxide rubbed into that side of the canvas. I kept wiping them out and putting them back in, until finally I surrendered and took them out for good. Sometimes you just have to accept that you can't say everything you want to say in a single painting.

I still wanted something in the upper right for balance, so instead I massed in a "less interesting" tree. I also changed the skyline slightly so as not to feel so hemmed in. The sky is pretty washed out here but my sky, while very light and simple, has more color (pale golds and blues).

Tuscany vineyard landscape painting

Up to the point pictured is about 5 or 6 hours' work. I started this late Friday afternoon and came back after dinner (and after the baby went to bed) to work on it some more. I just wanted to get it to a point where the whole canvas was brought up to the same level of "finish" (more or less) so that it would be easier for me to pick up again when I returned to the easel.

Once upon a time I was a total night owl and I'd habitually paint late into the night (this was before I started painting landscapes). I haven't done this in a really long time, and I'm not sure it's such a good thing for me. I only meant to work for a couple of hours but it was close to midnight by the time I cleaned up and I was so wound up I couldn't sleep for a while. Maybe I'll get used to it in time, but as it was, every time I'd go to clean up I'd tell myself, "just five more minutes!" Afterwards, I felt like I had had an entire pot of coffee! I kept telling myself it was time to stop, but now that I feel so often on a time crunch, any studio time is a real treat.

Ciel Dore

Here are the final images for the French landscape painting-in-progress I've posted about recently (see the progression at this link and this one.)  As I mentioned before, at this stage in the game, my main "statement" has taken shape, so  it is all about refining the idea. It might not be evident in the previous photos, but when I returned to the easel to finish the painting, I felt that the greens in the grass and shrubs were looking a bit too light/bright and slightly too cool for the quality of the light I was aiming for. So the first thing I did was to warm all of that up to give it more of that late evening sun-kissed feeling. Next, I worked on the shape, shadows and highlights of the foreground shrubs:

Followed by some subtle shading on the pigeonniere and refining the edges of the background shrubs:

My final decisions have to do with working out the shadows and highlights in the clouds to give them form. I was really reluctant to go back into the sky because I liked so much what was going on there and I didn't want to mess with it too much. But, given the state of the rest of the painting, I felt that it really needed some further development. So I took a page from the lessons learned from my abstract expressionist art school days. Namely, that one should not hold any single portion of a painting as "too precious" if it doesn't benefit the painting as a whole. I also have made minor alterations to the shapes of some of the clouds, and warmed up the sky at the horizon, because it was feeling a bit too cool for a sky that had so much warmth in the clouds.

Here is the final. I kept the composition simple because I really decided to push the color in this piece and make this a sky painting. Since I was working from composite images and memory rather than from life, the challenge was to make the light cohesive with the drama going on in the sky. I feel like I've gotten a pretty good representation of what I set out to achieve, so I am happy with the outcome.

"Ciel Dore" (Gilded Sky) Oil on Linen, 20x24" (SOLD) Jennifer Young

"Ciel Dore" (Gilded Sky) Oil on Linen, 20x24" (SOLD) Jennifer Young

Pigeonniere W.I.P. (continued)

Here are a few more progressive shots of the French landscape work-in-progress that I posted about last time. Since I have to spend a bit of time cropping, resizing, and uploading each photo, I again don't have much time to write if I also want to paint today. So let's hope the pictures will be at least a hundred words. ;-) Developing the clouds:

french landscape painting demonstration by Jennifer Young

And the pigeonniere:

France landscape painting in progress by Jennifer Young

Now I will spend some time refining (working on edges, tweaking shadows, developing highlights, etc.) The challenge for me is usually at this stage--to refine/change but to still keep it fairly loose and avoid overworking. We'll see how well I do in today's studio session!

Painting on a colored ground

Every so often I'll get a question about my painting process that I think might be an interesting topic to share here on my blog. Recently an artist friend asked me about the red ground I prepped my canvases with at one time.  I'm sure I've addressed toning a canvas a few times here on the blog, but since I've been asked about painting on a red canvas a number of times, I thought it would be a good idea to address this question specifically. Here is his question, followed by my response: Question: Are you still using red underpainting most of the time? Is that landscape specific or do you switch up for sky/water? 

My response: As for the red ground, I never use it any more. I really only used it for landscapes. It was fun because the underpainting gave vibratory effect due to it being a complement to the greens.  But it was too much of a distraction for sky and water, and ultimately I personally found it so for all of my landscapes, especially as I moved a little closer to realism.  Plus I got too lazy to tone my canvases that color as I'd have to let it dry first. Otherwise the red would lift and get mixed into my painting too much. Now in the studio I either just paint on a white canvas, or tone it with just a quick wash of transparent red  oxide (a.k.a PR101- the color I used in the tonal underpainting here).  That still adds a warm tone but is muted enough that it doesn't distract. It also isn't as high staining so I can apply a wash and then start painting immediately after.

*This artist is a studio painter, but I'll add here for the benefit of my blog readers that if I'm painting outdoors, I pretty much always use a mid-toned canvas of either gray, or a wash of trans red oxide or raw sienna, as sun on the white canvas creates too muchbounce and glare.