My Facebook page, plus two plein airs from the OBX

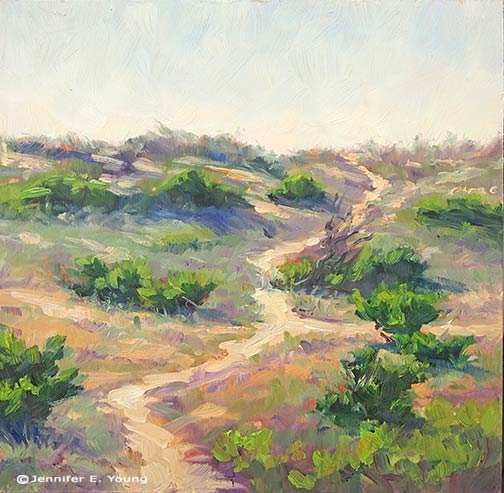
It's been such a while since I've provided some blog love, but there's been so much going on this summer that it's been hard to keep up. However I do  have two little plein air pieces I'd like to share, having just returned from a fabulous week on Hatteras Island in North Carolina's Outer Banks:

"Dunes at Salvo" © Jennifer E Young

"Dunes at Salvo" © Jennifer E Young

"Dunes at Salvo II" ©Jennifer E Young

"Dunes at Salvo II" ©Jennifer E Young

These are both 8x8 studies done on birch panels, painted from the lower and upper decks of the beach house we rented in Salvo. I only painted on a couple of mornings (it was the hubby's vacation too, after all) but I so love painting there that I look forward to doing more and more of these in time. Here you can see me through the picture window, painting on the deck, while the kiddos finished up their breakfast. You might just be able to make out a cup of coffee on the railing. I had my breakfast delivered easel-side, too! Not a bad way to spend the morning. :-)

Jennifer Young painting plein air

I didn't get to paint out on the shore due to either the timing or the wind, but hope to do so when we return to the Outer Banks in about a month. Though the legs are starting to go, I'm still lugging my big old Soltek easel around. However I'm finding it more and more cumbersome for travel. I may have to dust off my little Prochade kit for my next trip, though I will need to get used to the much smaller palette size again, and the fact that it does not stand up well at all to any kind of wind.

This is the first time I have painted on shellacked birch panel, but I really like it. I prepared my own panels with Zinsser Bullseye Shellac, two coats per side, and sanding in between. I have heard about this kind of panel before, but it was most recently recommended by Matt Smith in his workshop that I attended in the Spring, so I was eager to try it after that. I was a little afraid that the shellac would make for too slick a surface, but it was the just right amount of smoothness and tooth. It did take a little preparation, but once the panels were sealed, the wood provided a lovely blonde tone on which to paint...no extra toning needed.

One final note, I have finally created a Fan page on Facebook, on which I plan to update with announcements and goings on. You'll find a link to it in this post and also in the right sidebar. I guess I'm not exactly on the bleeding edge, but at least now I can finally say, "Like us on Facebook"!

Matt Smith workshop

Oh yeah, I have a blog! ;-) Actually, I didn't forget; I've been doing a little traveling up north to the New Hope School of Art to take a workshop from the very talented painter Matt Smith. The trip was noteworthy for a number of reasons. First, it was the first time I have been away from my daughter for more than a night. (That part was hard.) But second, it was also the first time I've had in 4 years to do nothing but paint and immerse myself in "art stuff" for four days straight. (And that part, my friends, was luxurious!) I haven't taken a workshop in a very long time. But now that my daughter is getting a little older, I really feel like it's time to amp up my art life in some significant way and infuse my work with new insights. So when I heard Matt was coming east to teach (he's based out West, so that's something I'd not caught wind of before around here) I knew it would be an excellent opportunity to do just that.

Please excuse the poor photo quality but this was shot with my iPhone in low light. Here you can see the very light way Matt holds his brush to apply paint and manipulate edges.

Matt hails from Arizona, and is best known as a painter of the Sonoran desert near his home, as well as the snow capped Canadian Rockies and other places out west that epitomize the classic western landscape. What initially attracted  me to his work though was not his subject matter, but the sensitivity in the handling of  his brushwork and edges. They are both bold and delicate at the same time.  But after seeing him demo and talk about his approach, I was equally impressed by the purposeful way he composed his paintings and orchestrated his compositions to createpowerful statements. I won't get into a blow by blow description of day 1-4 of class, but I will share some of the significant things I took away from it personally, most likely in more than one post.

The interesting thing about this workshop was that even though Matt is best known among artists as a plein air painter, the class was held entirely inside, in the studio. I'll be perfectly honest here and say that when I signed up for the class I was mildly disappointed that the format would not include at least part plein air painting, especially since Matt himself is a seasoned field painter and the area where the workshop was located was very scenic. (It was the birthplace, in fact, for an entire movement of landscape painters, known as The New Hope School and Pennsylvania Impressionism.) Largely though, that disappointment was entirely personal. My studio is my workhorse, but plein air painting is more exciting to me. Also with my life situation at present, I just don't get the longer stretches of time needed to trek out in the field as often to paint.

When I asked about the reason for the indoor class, Matt's response was that in his years of teaching, he has seen the same problems pop up again and again, whether in the field or in the studio. Maybe he felt it's better to address these fundamental issues in a controlled environment rather than adding another layer of difficulty with the environmental factors that plein air adds. In any event, the format turned out to be fine. In fact, there was plenty I needed to work on just with my studio work,  the studio environment definitely allowed Matt to get to each student several times a day with valuable feedback. As it turned out, the weather was not great any way, and we probably would have needed to seek shelter for at least two of the four days due to rain and wind.

Matt did several very good demos (using his photo references). He used a Strada easel, which I think was a rather new purchase for him. He talked a lot about equipment and painting gear, which, as any regular reader of my blog may have surmised, is a topic of great interest to me. The Strada is made of metal and looked like a neat little box (I think his was the mini, which is presently sold out.)

The Strada Mini Easel

But even without the two winged accessory attachments added to provide more workspace, it was a very heavy box for its size. Matt said he liked it because of its compact size (it easily fits into a backpack) and durability for travel, but personally I could not deal with the heft. A Gitzo travel tripod was also part of his setup, which looked great for its ease of use and small size when folded (also easily fitting into a backpack), but a quick Google search soon told me this item was way out of my price range. (Wowsa!)

Matt, by self-definition is not a colorist. In fact, of the fundamentals he sites as essential to a good painting (Drawing, Value, Design, and Color) the most expendable he says, is color. Even so,  I found his palette fairly wide, with four blues, two earths, two yellows, an orange, one red, a violet, and a couple of greens (plus, of course, white.) He used no medium other than his oil paint and a very tiny amount of Gamsol to thin his paints.

His start consists of a very light sketch, soon followed by masses of color, working broadly to get his main elements and shadows down. He then builds from there, thin to thick, dark to light, broad to more detailed. One thing I found interesting is that he almost always left his sky a white canvas until close to the very end of the process. Obviously this is working to his great advantage, but try as I might, I couldn't resist my normal method of putting the sky in early on. This was especially the case if there was any water in the landscape, as I find  I need that sky information to know what's being reflected.

I've a lot more to say on the subject but I should probably try and paint something now! In my next post I'll share of few of my studies done in the workshop, as well as some valuable take-aways that I received from Matt's feedback.

Clean your brushes

For a painter, this guidance is akin to Mom telling you to eat your vegetables , and every artist knows this is the right thing to do. Do I do it? Not as often or as thoroughly as I should. It's my dirty little secret. I do treat my sables a bit better, but my bristle brushes take some abuse. I am trying to do better, but even after all of these years, I'm not quite there yet. The proper approach to brush care is to give your brushes a good rinse in solvent (for oil painting brushes) followed by a wash from the ferrules down to the tip with a brush cleaner or dish soap, pushing the remaining paint out as you go. Once thoroughly rinsed, push the remaining water out and reshape with your fingers and just a dab of the brush soap, or just with water and leave to dry.

Don't leave your brushes head down in paint thinner (I used to do that). The bristles will lose their shape sooner and eventually the ferrule will loosen from the wood handle and fall off. Don't leave them head down in oil either (that's what I often do now- walnut oil- especially if I plan to return to the easel the very next day). Better but still not the best practice is to rinse out with oil and then paint thinner, and wipe clean with paper towels and reshape (this I do most often). When I do wash my brushes, I like Master's brush soap. It does a good job of getting off dried paint, which happens often enough with delinquents like me. Nevertheless, once the damage has been done, the shape of your brushes will never be the same. So save yourself a lot of time and money by doing it right the first time.

P.S. And while you're at it, would it kill you to clean your palette every once in a while?

oil painting materials

Lake Como W.I.P./Demo (continued)

Well I promised color in my last post, so let's get started! I don't know if I mentioned it lately, but I have been experimenting with expanded palettes for my latest paintings, and that exploration continues with this one. Regular readers may remember that I have for a long while used a limited palette of red, yellow, and blue, plus white (like this one). For this painting, my palette is (as I lay it out from left to right) Titanium White, Cadmium Yellow Light, Golden Ochre (Rembrandt), Cadmium Orange, Cadmium Red, Alizarin Permanent (Gamblin), Cobalt Blue, and Ultramarine Blue. (I've specified brands where color names are specific to a particular brand.)   I haven't used any pre-mixed greens, as you can really mix a zillion different greens with this palette. I have used most of these colors off and on, with the exception of Cobalt Blue. To be honest, I was really hoping that I wouldn't like it, because it is a terribly expensive tube of paint. Of course, I love it!  It is a cooler blue than Ultramarine, which has more red in it. I still love Ultramarine, but Cobalt has some really wonderful possibilities. Any way, back to the painting...I start by painting in the sky, which contains the light source and is also the farthest in distance. The sky is Cobalt blue plus white, with cad yellow lt. added as it nears the horizon. For the clouds I've mixed a combination of blues and cads red and orange + white for the shadows, and Cad orange and red + white for the highlights.

20120921-150523.jpg
20120921-150523.jpg

Working from back to front, I next paint in the distant cliffs, which have a beautiful shadow casting down over them from low-lying clouds. The photo is a bit dark here (apologies) but I will try to get some more accurate photos in subsequent blog posts so you can get a better idea of the colors.

The distant mountains complete, I block in the buildings that jut out into the harbor, as they will serve as my area of interest in the painting, and everything will kind of flow to lead the eye towards them. I also decide to lay down my pattern of darks, to restate the plan I made in my notan sketch. Again, this photo just blackens everything out, but I had to make a choice between using my time blogging or photo editing, and at this point, I've chosen blogging.

20120921-150612.jpg
20120921-150612.jpg

Next, I work on the terraced hillside in the middle distance. What a joy it is to paint...all of those shadows and varied greens! A nice round bristle brush is great for painting in those cypress trees, which have always struck me as distinctive punctuation marks in the Italian landscape. .

20120921-150639.jpg
20120921-150639.jpg

 A mahl stick (shown in the next photo  on my easel below the painting) is a handy tool to have to steady the hand without smudging the painting, when painting details like architecture and tall skinny cypress trees.

20120921-150656.jpg
20120921-150656.jpg

I have yet to paint in the highlights on the cypresses, but once I've done that I will be ready to move on to the middle distant water and boats, and finally the boats in the foreground. All that will be left after that point will be fine tuning  wherever's needed.

Season of Plenty (Provence painting complete)

Just a quick post to follow up on the W.I.P. I shared on Wednesday...Here is the painting, now complete (more or less).

"Season of Plenty" Oil on linen, 16x20" ©Jennifer Young

"Season of Plenty" Oil on linen, 16x20" ©Jennifer Young

There is some glare in the photo so I may need to attempt a re-shoot this weekend. Nevertheless I think it gives a pretty good indication of the final. I managed to maintain my single primary palette to completion, just to prove I could do it. But I am not sure if this color- limiting exercise was to the benefit of the painting, so I will set it aside for a few days and think it over before making any adjustments.